1-4 DAYS DELIVERY
D-Craft
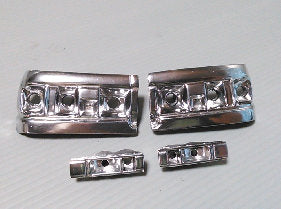
TRUENO AE86 Front Signals and Taillight Light Buckets TAIL Assemblies [D-Craft] PT2
$23.99
In Stock
Pre-Order
Sold out
SKU: PT2
SKU: PT2
Categories: All Products, Body Accessories, Head/Tail Light Buckets
100% ORIGINAL AND QUALITY
24 MONTHS GUARANTEE
- Description
- Reviews
TRUENO AE86 Front Signals and Taillight Light Buckets TAIL Assemblies [D-Craft] PT2
*These were originally designed for the Pandora AE86 HATCH. Most people use these with other brand bodies.
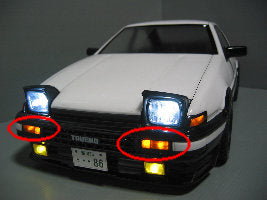
These feature the realistic front and rear in hand made chrome finish. Give your body the next level of realism.
Includes front turn signal lamp markers and rear lights
○ Made of resin cast, realistic shape and sturdy.
○ Chrome paint finish.
○ Each LED mounting hole is 5 mm specification.
Don't forget the headlights:
https://supergdrift.com/product/ae86-trueno-functional-popup-headlight-assemblies-ae86-more-d-craft-pt1/
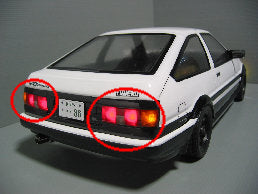
After painting suddenly, please mask the tail lens according to the mold of the body. I was wondering if the attached sticker could be used as a mold, but it didn't work at all ... It seems easier to mask the outline with a thin masking tape (about 6 mm). After painting, apply the tail parts and use a thin pen to add the back lamp and blinker painting lines.


Masking with. It's hard to understand by blowing clear red and orange, but smoke is blown at the bottom of the lens. Finally, paste the lens cut and fix the light parts to


*These were originally designed for the Pandora AE86 HATCH. Most people use these with other brand bodies.
These feature the realistic front and rear in hand made chrome finish. Give your body the next level of realism.
Includes front turn signal lamp markers and rear lights
○ Made of resin cast, realistic shape and sturdy.
○ Chrome paint finish.
○ Each LED mounting hole is 5 mm specification.
Don't forget the headlights:
https://supergdrift.com/product/ae86-trueno-functional-popup-headlight-assemblies-ae86-more-d-craft-pt1/
After painting suddenly, please mask the tail lens according to the mold of the body. I was wondering if the attached sticker could be used as a mold, but it didn't work at all ... It seems easier to mask the outline with a thin masking tape (about 6 mm). After painting, apply the tail parts and use a thin pen to add the back lamp and blinker painting lines.


Masking with. It's hard to understand by blowing clear red and orange, but smoke is blown at the bottom of the lens. Finally, paste the lens cut and fix the light parts to


![180SX Garnish Decal (carbon style) RPS13 CF 1-10 [PANDORA RC] VGP-628](http://supergdrift.com/cdn/shop/files/180sx-gamish-ca02_{width}x.jpg?v=1766865574)
![1/10 CBR Hurricane Door Mirrors [Pandora] APA-1582](http://supergdrift.com/cdn/shop/files/door-mirror-cbr-hurricane-01_{width}x.jpg?v=1766864727)
![1/10 TURBO Type Grill for RPS13 180SX [Pandora] APA-1581](http://supergdrift.com/cdn/shop/files/duct-turboa-02_{width}x.jpg?v=1766864641)
![1/10 R33 Type Grill for RPS13 180SX [Pandora] APA-1580](http://supergdrift.com/cdn/shop/files/duct-33type-02_{width}x.jpg?v=1766864557)
![1/10 Sun Roof for RPS13 180SX [Pandora] APA-1579](http://supergdrift.com/cdn/shop/files/sun-roof-rps13-180sx-01_{width}x.jpg?v=1766864389)
![DLPM Conversion kit AND LP-86 1-10 DRIFT KIT M-Chassis Size [D-Like] DLPM-01](http://supergdrift.com/cdn/shop/files/IMG-2554_{width}x.jpg?v=1766877446)
![DLPM Conversion Kit (M-Size) 210mm 225mm 239mm (for LP-86) LP86 DLPM [D-LIKE] DLPM-C-01](http://supergdrift.com/cdn/shop/files/IMG_2531_{width}x.jpg?v=1766877446)
![Rear Spool Axle (For GALM/Steel) [OVERDOSE] OD2415b](http://supergdrift.com/cdn/shop/files/ref1603159185_200_{width}x.jpg?v=1766855868)
![Nissan RPS13 180SX Kouki (TOHOKU STYLE) 1-10 Body Set [Pandora] PAB-3226](http://supergdrift.com/cdn/shop/files/rps13-180sx-tohoku-01_{width}x.webp?v=1766517727)
![PREORDER: Light Weight Aluminum Rear Axle Shaft (For Galm ver2) (RED PURPLE BLACK) [Overdose] OD3982 OD3981 OD3980](http://supergdrift.com/cdn/shop/files/od-cvd1_{width}x.jpg?v=1766507701)

